Managing Users
Business account administrators are responsible for managing users that make purchases for their organization on fishersci.com. Understanding user management is essential to taking advantage of our Fund Tracking and Dollar Rules & Requisitions functionalities. Once funds are created, or dollar rules are set, you can give users access to certain funds or apply certain dollar rules for them using the User Admin Dashboard.
Read this article to learn how to add users, set their permissions and access, and create approval groups and user hierarchies.
Learn more about:
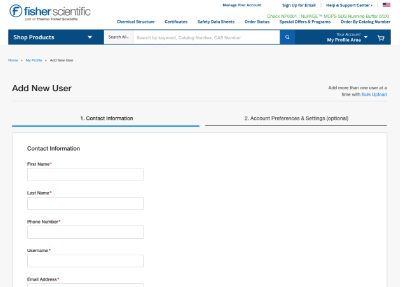
Single Users
Follow these steps to set up new user accounts for colleagues in your organization, including their account settings and permissions.
- Sign in to your business account and select Profile from the Your Account dropdown, then User Admin.
- From the Manage Users tab, click Add New User.
- Follow the prompts, first filling out their contact information, including first name, last name, phone number, email address, and username.
- Then select their account preferences and settings, including their assigned business account, permissions, and payment method restrictions.
- Click Add New User. You’ll see a confirmation that an activation email has been sent to your colleague. They’ll need to respond to the invite to set their password, industry, and accept site terms and conditions.
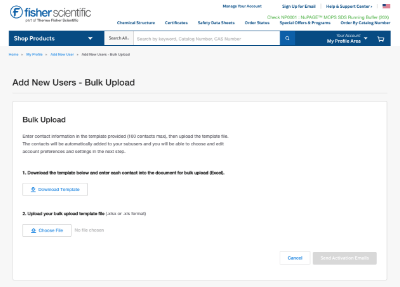
Bulk Import
- Sign in to your business account and select Profile from the Your Account dropdown, then User Admin.
- From the Manage Users tab, click Add New User, then Bulk Upload in the upper right corner.
- Click Download Template and save the document. Enter the first name, last name, phone number, email address, and username for each user.
- Next click Choose File, then select and upload your file.
- If there are any processing errors, a data report can be downloaded with details.
- Finally, click Send Activation Emails. You’ll see a confirmation that an activation email has been sent to your colleagues. They’ll need to respond to the invite to set their password, industry, and accept site terms and conditions. You can track statuses under the User Admin tab of your profile.
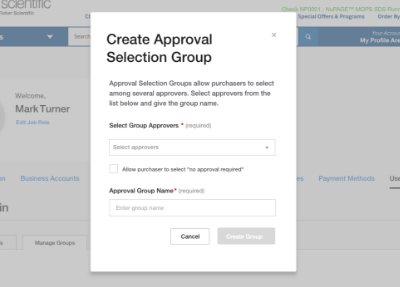
Organize and streamline your organization’s online purchasing with approval groups. Approval groups can be used to create order approval workflows that consist of approvers and their assigned users.
Creating an Approval Group
- Sign in to your business account and select Profile from the Your Account dropdown, then User Admin.
- Click Create Approval Selection Group.
- Select the Group Approvers using the checkboxes in the dropdown. A warning message will appear if the approver is already assigned to another group. Check No approval required if users within the group can make this selection when purchasing.
- Enter the Approval Group name and click Create Group. Users and approvers will automatically appear in the group based on assignments.
- To make any changes, simply click Edit Group.
Assigning Users to an Approval Group
- To assign users to an Approval Group, go to the User Admin tab of your profile.
- Select the three dots next to the name of the user you’d like to assign and click Assign User to Group.
From the User Admin tab of your profile, you can create and oversee a user hierarchy if you want to delegate user, account, and order approval management to colleagues. Administrators can designate certain users as approvers and assign users to them.
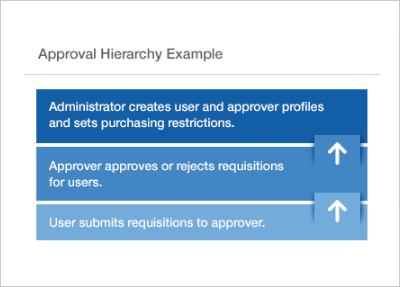
Creating a User Hierarchy
To create a user hierarchy, you’ll need to create approver groups and assign users to those groups. Once those are set up, you can view your hierarchy by visiting the User Admin tab of your profile, then the Reporting Structure tab. This page shows a visual representation of your hierarchy with users displayed based on their administrator and approval group assignments.
From this page, you can add new users or move users in the hierarchy by clicking the three dots next to their name.
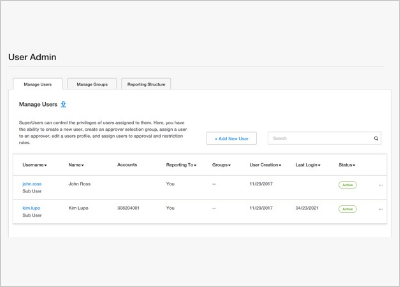
Add new users and manage user access all from one screen. Whether you’re assigning shipping accounts, dollar rules, payment methods, or deactivating user access, the User Admin Dashboard makes it easy.
To get started, visit your profile and select the User Admin tab, then Manage Users. There you’ll see information for all the users assigned to you, including their name, accounts, who they report to, and groups they belong to.
From this page, you can update a user’s information, including:
- Fund assignments
- Dollar rules
- Approver group assignment
- Hierarchy position
To make changes to any of these user settings, simply click the three dots in the right column and choose from the menu of options.


 Email Us
 Call
Call Report a Site Issue